Friday, July 26, 2019

Good Morning Magnolia Scrapbook Layouts


 Good Morning Magnolia

The new Good Morning Magnolia Suite from Stampin' Up! is fast becoming an internet sensation.  There are hundreds of beautiful cards and home decor pictures on Pinterest from talented demonstrators from all over the world.   But I couldn't wait to create a scrapbook layout with the collection. Well, actually 2 layouts. (video link at bottom of post)


The cool, charming colors of Petal Pink and Mossy Meadows are two of my most favored and they look beautiful when done in these glorious magnolia prints.  The top layout was done using some of the Designer Series Papers and Magnolia Memories Dies.  

Those beautiful 3D flowers were so easy to cut, color and layer.  The page title and  darker green leaves behind each flower were some I created and cut on my Cricut. The soft, vellum leaves were cut from the dies. I love mixing prints and then layering on texture and the soft and subtle Very Vanilla Scalloped lace trim was a very delicate way to do that.  


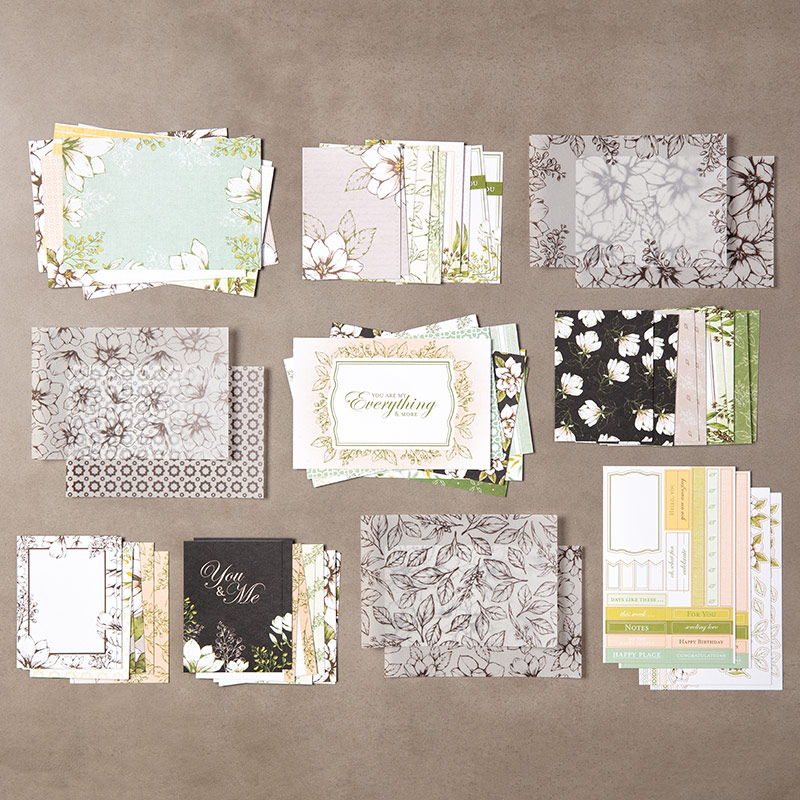
This suite also has the Magnolia Lane Memories & More Cards available.  I couldn't wait to use these to create a second layout idea. This one had a similar two page layout, but I added another page, using the Memories and More cards with the Variety Pack Photo Pages.  It was super easy to choose my favorites, add a few embellishments and layers and insert them into the photo pages.  And voila, a quick and easy way to add even more memories into your scrapbook.  


I used some of the extra cards from the package to fussy cut more flowers to use with my title and as layering pieces on the pages.  There is even some vellum cards, printed with the most beautiful flowers.  I used the Whisper White ink to color the back of some of the flowers  and them Petal Pink, So Saffron and Old Olive Blender pens to color in the flowers and leaves.  I love the soft look this added to the pages. 

Some of the larger memory cards also made great page embellishments and sentiment pieces.  This suite is just a lovely addition to your memory keeping and scrapbooking projects. Both the Designer Series Paper pack and the Memory Card pack have enough in them to allow you to complete numberous cards and layouts.  From weddings, to newborns, to cherished family moments, this collection is one not to miss.   


For imformation on how to order this, just click on any of the links below and you will be taken straight to my Stampin' Up! store. 
Use the Hostess code:  
DVWT2F44 
when placing your order and receive the title and two card kits FREE from me as a thank you!  

Watch Video Here!


Product List

Wednesday, July 3, 2019

View this email in your browser


Now more than ever...it's the perfect time for owning a Stamparatus

The newest Cataglog from Stampin' UP! is filled to overflowing with gorgeous new stamps sets.  And many are created with a multi layer stamping ability.  This allows you to create gorgeous, multi colored artwork, but can be a little tricky or time consuming to line up if you  a creating multiple pieces.   Plus,JULY is Bonus Days!  A great chance for you to earn $5 coupons with your $50 merchandise purchases, to spend in August!  So I wanted to share with you a tip or two on how to simplify your multi-layering stamping with the wonderful Stamparatus.  

The Stamparatus comes with two, incredibly strong magnets.  These are great when you just want to make a quick impression and can "work around" the magnets to get a clear stamping.   But I have found a new way using some "sticky grid sheets".   While these are not Stampin' UP! products, they do work beautifully with the Stamparatus and can be bought at most local craft stores or online. 

If you do a lot of stamping, make multiples of projects or just want to make sure you get a perfect impression every time, nothing beats the Stamparatus.  And the new Deluxe Foam Mat, teamed with these sticky grid sheets is the perfect solution for super easy, super quick, repetitive placement for your stamping. 


Let's get started with how to use these sheets with your Stamparatus. (If you want to skip to a Video I that shows all these tips, just use this link:    https://youtu.be/8S3BBDziJSo)

Here'e a quick and easy card I made, featuring the new To a Wild Rose Bundle.    It's a beautiful bundle that lets you create gorgeous multi layer stamping and the dies are so versatile. 


What is Sticky Grid Sheet?  From Sizzix, it was designed to hold small dies in place on cutting plates.  It is adhesive on both sides, with an adhesive that a little stronger tack than a post it note, and strong enough to be used multiple times. Strong enough to hold, but won't damage your paper.   Printed with a grid design, perfect it you did want to use it to line up dies for cutting or in this case to ensure your stamping surface is straight. But, used on the Deluxe Foam Mat for our Stamparatus, it allows for perfect alignment of your stampable papers, with the ease of removing and replacing your paper to be stamped.  At only 2 1/2" wide by 4 1/2" tall, it's strong enough to hold your cardstock in place, but small enough to hide behind it, so as not to get in the way or your stamping. 

Here's a picture of how I placed one of the Sticky Grid Sheets on the Deluxe Foam Mat. Note, I also use a little washi tape to create a border to know where to line up the piece I will be stamping.  And the beauty of both the sticky sheet and the washi are they are easy to place, remove and reuse.  You can place the sticky grid paper anywhere on your mat, I just prefer stamping in the middle of my mat, so I can make sure to apply even pressure and not have to worry about being too close to the edges and not getting even pressure. 

Once I have these in place it's easy to lay the first piece to be stamped down on the sticky sheet, butted up to the washi tape border, line up my stamps on the Stamparatus grids and then start stamping. And then, voila, I can simply lift the first one off and stick down the next piece to be stamped.  There is a small strip at the bottom of the sticky grid paper that is not tacky, so you may want to pull from the top to prevent pulling the sticky grid paper up with your cardstock.  If your grid paper does come up, just place it back on the foam mat.  Remember the washi tape marks where your cardstock goes, not the sticky grid on the back. 


Here's Tip #2 on getting the best, time saving results when using your Stamparatus:  Inkspots.    

Of course, you can use your full size ink pads with the Stamparatus.  But using some of the smaller ink spots, that you have loaded with your favorite reinker colors, makes stamping with the Stamparatus a breeze.  I just downloaded the catalog page with the colors, printed them on photo paper to get clear, bright colors and used a double sided adhesive to turn them into stickers.  Then it was easy to label my Inkspots.  I love having these handy travel sizes ready to grab and go, too!   And at only $9 for 5 spots, it's a great value!


Again, here's a video of the actual stamping of this card:    https://youtu.be/8S3BBDziJSo
Hope you enjoy!


So how to get your FREE Gift with purchase...

It's simple!  Just place an order for a Stamparatus from my Stampin UP! store and use the 

Hostess Code  DVWT2F44
and I will send you your gift for "Sticky Grid Sheets"
and another surprise gift.**

** Remember, if your order is over $150, don't use the Hostess Code, but you will still receive your FREE Gifts.

Plus!!!!! be sure to take advantage of July Bonus Days!
Important note!  If you take advantage of this special
July Event and earn Bonus Day coupon
...be sure to save the email with your coupon numbers on them.
Coupons can be spent in August!


Product List
*|MC:SUBJECT|*
View this email in your browser


Now more than ever...it's the perfect time for owning a Stamparatus

The newest Cataglog from Stampin' UP! is filled to overflowing with gorgeous new stamps sets.  And many are created with a multi layer stamping ability.  This allows you to create gorgeous, multi colored artwork, but can be a little tricky or time consuming to line up if you  a creating multiple pieces.   Plus, JULY is Bonus DaysA great chance for you to earn $5 coupons with your $50 merchandise purchases, to spend in August!  So I wanted to share with you a tip or two on how to simplify your multi-layering stamping with the wonderful Stamparatus.  

The Stamparatus comes with two, incredibly strong magnets.  These are great when you just want to make a quick impression and can "work around" the magnets to get a clear stamping.   But I have found a new way using some "sticky grid sheets".   While these are not Stampin' UP! products, they do work beautifully with the Stamparatus and can be bought at most local craft stores or online. 

If you do a lot of stamping, make multiples of projects or just want to make sure you get a perfect impression every time, nothing beats the Stamparatus.  And the new Deluxe Foam Mat, teamed with these sticky grid sheets is the perfect solution for super easy, super quick, repetitive placement for your stamping. 


Let's get started with how to use these sheets with your Stamparatus.  (If you want to skip to a Video I that shows all these tips, just use this link:    https://youtu.be/8S3BBDziJSo)

Here'e a quick and easy card I made, featuring the new To a Wild Rose Bundle.    It's a beautiful bundle that lets you create gorgeous multi layer stamping and the dies are so versatile. 


What is Sticky Grid Sheet?  From Sizzix, it was designed to hold small dies in place on cutting plates.  It is adhesive on both sides, with an adhesive that a little stronger tack than a post it note, and strong enough to be used multiple times. Strong enough to hold, but won't damage your paper.   Printed with a grid design, perfect it you did want to use it to line up dies for cutting or in this case to ensure your stamping surface is straight. But, used on the Deluxe Foam Mat for our Stamparatus, it allows for perfect alignment of your stampable papers, with the ease of removing and replacing your paper to be stamped.  At only 2 1/2" wide by 4 1/2" tall, it's strong enough to hold your cardstock in place, but small enough to hide behind it, so as not to get in the way or your stamping. 

Here's a picture of how I placed one of the Sticky Grid Sheets on the Deluxe Foam Mat. Note, I also use a little washi tape to create a border to know where to line up the piece I will be stamping.  And the beauty of both the sticky sheet and the washi are they are easy to place, remove and reuse.  You can place the sticky grid paper anywhere on your mat, I just prefer stamping in the middle of my mat, so I can make sure to apply even pressure and not have to worry about being too close to the edges and not getting even pressure. 

Once I have these in place it's easy to lay the first piece to be stamped down on the sticky sheet, butted up to the washi tape border, line up my stamps on the Stamparatus grids and then start stamping. And then, voila, I can simply lift the first one off and stick down the next piece to be stamped.  There is a small strip at the bottom of the sticky grid paper that is not tacky, so you may want to pull from the top to prevent pulling the sticky grid paper up with your cardstock.  If your grid paper does come up, just place it back on the foam mat.  Remember the washi tape marks where your cardstock goes, not the sticky grid on the back. 


Here's Tip #2 on getting the best, time saving results when using your Stamparatus:  Inkspots.    

Of course, you can use your full size ink pads with the Stamparatus.  But using some of the smaller ink spots, that you have loaded with your favorite reinker colors, makes stamping with the Stamparatus a breeze.  I just downloaded the catalog page with the colors, printed them on photo paper to get clear, bright colors and used a double sided adhesive to turn them into stickers.  Then it was easy to label my Inkspots.  I love having these handy travel sizes ready to grab and go, too!   And at only $9 for 5 spots, it's a great value!


Again, here's a video of the actual stamping of this card:    https://youtu.be/8S3BBDziJSo
Hope you enjoy!


So how to get your FREE Gift with purchase...

It's simple!  Just place an order for a Stamparatus from my Stampin UP! store and use the 

Hostess Code  DVWT2F44
and I will send you your gift for "Sticky Grid Sheets"
and another surprise gift.**

** Remember, if your order is over $150, don't use the Hostess Code, but you will still receive your FREE Gifts.

Plus!!!!! be sure to take advantage of July Bonus Days!
Important note!  If you take advantage of this special
July Event and earn Bonus Day coupon
...be sure to save the email with your coupon numbers on them.
Coupons can be spent in August!


Product List
Twitter
Facebook
Website
Copyright © *|CURRENT_YEAR|* *|LIST:COMPANY|*, All rights reserved.
*|IFNOT:ARCHIVE_PAGE|* *|LIST:DESCRIPTION|*

Our mailing address is:
*|HTML:LIST_ADDRESS_HTML|* *|END:IF|*

Want to change how you receive these emails?
You can update your preferences or unsubscribe from this list.

*|IF:REWARDS|* *|HTML:REWARDS|* *|END:IF|*