Monday, December 3, 2018

New Scrapbook Layouts for the Holidays


Happy Holidays and Merriest of Christmas' to everyone.  Me and my Scrapping  with More Crop friends just wrapped up our first ever 3 day scrapbooking event we hosted in Lake Charles, LA.  And it was an amazing event.  The ladies that attended were incredible and the talent, friendship and excitement in the room was just glorious!  Can't wait til our next crop. 

 We even had Santa stop by for a visit.  But I think the most special moments were when 32 of the guest, who had signed up for a Cajun Christmas gift exchange swap sat down and shared their gifts with each other.  One of the ladies, Delta T. actually stopped to calculate that 32 crafter by 32 gifts each mean that 1024 mostly handcrafted gifts  of friendship were exchanged that night.  Wow, that really brought home how wonderful this time of the year is, and how it reminds us to slow down and celebrate our friends and family and tell them how much they mean to us. 

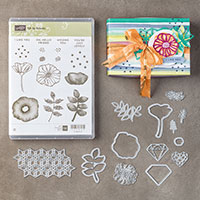
At the event, I previewed over a dozen new kits for sale.  I was overjoyed with the reception.  I am always thrilled to the core when I see fellow scrapbookers making my kits and putting their photos on them.  Even more, I love when they show me how they "tweak" the kits to make them their own. 


 Pictured here are just a few of the
kits I have for sale that will be perfect for your holiday pictures.  There are even a few new ones that are non holiday, that I hope you will like. 

https://craftingmemorieswithmolly.blogspot.com/p/classes-and-kits.htmlnew


You can see all the kits available that clicking on the Scrapbook Kits link on the left sidebar or clicking the link I pasted above.

Please let me know if you would like any, by emailing me at:

mollydowning@hotmail.com and putting scrapbook kits in the subject line. 

Wishing all of you the very merriest of Christmas seasons and the most wonderful new year!
Hugs,
Molly D


https://craftingmemorieswithmolly.blogspot.com/p/classes-and-kits.html

Wednesday, October 24, 2018

Just Updated! Scrapbook Kits!

I have just updated the Scrapbook Kits page.  Had to move several to the Sold Out section.  And posted pictures of new ones.  If you are interested in seeing more about these...just click the link to the left for the Scrapbook Kits and see what's new and all the kits available!  


Thanks and Happy Fall, Y'all!
Molly D

Thursday, August 30, 2018

Card Swap for Stampin Retreat Weekend


I was  so excited to be heading off to our first ever Stampin' Up! team retreat this past weekend.  My upline, Susan Levasseur is an incredibly talented woman.  And so generous!


She hosted our  teams together this past weekend at a beautiful retreat house in Lafayette, LA for 2 1/2 days of crafting and sharing.  I can't wait to share with you all what we create together.

Each team member was allowed to invite one guest, so that doubled the fun!  As a demonstrator, we were also asked to create a card kit for all the attendees to complete.  For my kit, I chose to use the "Rooted in Nature" bundle #148353.


I "CASED" (copy and share everything) a card from Pinterest that showcased the set and a fun technique using Sponge Brayers and masking tape.  The card I was inspired by was created and shared by DOstampinwithDawn.  And it is lovely.  I used that technique and added a bit of embellishments, die cuts and a bit of "corrugated" crumb cake to finish it off.

Here's the video of how I made this card:


Project Recipe:

  1. Card base: Cajun Craze Cardstock, cut to 5 1/2" by 8 1/2". Then scored at 4 1/4" on longest side and folded in half to create a side fold card
  2. Whisper White Cardstock: cut 2 pieces to 4" x 5 1/4". One is for the outside and one for inside card.
  3. Card front: place masking tape on one piece of the Whisper White cardstock to leave an exposed white strip, approx. 1 1/2" wide. To do this, place one piece of masking tape to cover the first 1" from top to bottom on the left side of card. Then place another piece of masking tape at 2 12", from top to botton. This will leave 1 1/2" of white exposed. I used 2" wide blue painters tape and lined my card front on a sheet of Stampin' UP! grid paper to make this task simple.
  4. Using sponge brayers, pick up your lightest color and roll onto the card front starting at the bottom and ending up about 2 1/4" from bottom. Then using a different brayer pick up your next lightest color, and blend at the top of that and end about 4" from bottom of card. Next, use a different sponge brayer and pick up darkest shade and sponge to top of card. You can go back over the colors to get the exact blend you like. I used: Pineapple Punch, Mango Melody and Cajun Craze on this card. But you could use other color families. Just use at least three colors to create your background. Note: to get an all over blending gently roll your brayer from different directions, not just side to side. Remember to not create too dark of a blending where the tree will be stampled.
  5. Large Tree Silhouettte from the Rooted in Nature bundle: Remove the masking tape from the card front and stamp large tree image with Memento Tuxedo Black ink on the left side of masked strip, with tree half on white and half on colored strip. Image should start approx. 1" from top of card front.
  6. Corrugated Crumb Cake pennant: cut a piece of Crumb Cake cardstock to 1" by 3 1/2" wide. Emboss with the new "corrugated" 3D embossing folder. Cut left end to a slight diagonal to create your pennant. You will next prepare your other embellishments to place behind this strip.
  7. Emboss and die cut 1 large leaf from Cherry Cobbler cardstock and one triple leaf from Pumpkin Pie cardstock.
    Punch one triple leaf branch from gold foil paper, using the Leaf Punch.
    Stamp and die cut out one small leaf with Whisper White Cardstock, using Black Berry Bliss ink.
    Cut a piece of Gold Thread, approx. 24" long.
  8. Corrugated Strip: Now put double sided tape on the back of the embossed Crumb Cake Strip and adhere the to leaves, cut from solid cardstock, as seen in picture to the back of this strip. Make a circle of the Gold Thread, approx 2 3/4" in diameter and adhere behind these leaves, to corrugated strip. Then adhere this embellishment to card front, on right edge, approx. 3/4" from bottom.
  9. Using a small strip of Whisper White cardstock, approx. 3 1/4" wide by 1 /2" tall, stamp the "Word are never enough" sentiment in Memento Tuxedo Black ink. Then cut the left end to a diagonal and adhere the Gold Foil punched leaves to the back of this and attach to top of corrugated strip.
  10. Stamp and die cut the small skeleton leaf image, using Blackberry Bliss ink and tuck under the Pumpkin Pie leaves, as seen in picture.
  11. Inside Card: Stamp the "to thank you for all you do" sentiment on Whisper White piece for inside card. Adhere to inside and you are through.
    Hope you enjoyed making this card and create new versions using other color combinations!
Product List


Sunday, July 29, 2018

Getting ready for our new Crop event!

I am so excited to be putting the finishing touches on the preparations for our new crop adventure me and four incredible crafters will be hosting in Lake Charles, La. 

Since I was almost finished with the final to do's for the crop, I took a bit of time out and created some new layouts.  To see them all and more, just click on the Scrapbook kit link on the left.  

If you would like to see more about the crop, visit our Facebook Page under the name:  
Scrapping and More Crops.  The five of us are all so happy to be hosting this event.  

Here is a picture of a few of the kits, but head to the Scrapbook Kit page to see more:


Hope you all are crafting beautiful memories this summer! 
Hugs,
Molly D


Friday, May 11, 2018

Share What You Love Special Offer

Exciting Early Release and Special Offer

So excited, it's early release time for  the Share What You Love Bundles from Stampin' Up!.  Take advantage of this beautiful early release and receive some gorgeous new product and earn free items,  from Stampin' Up! and me!  Anyone who knows me at all, knows I love designer print papers.  This new collections from Stampin' Up!  is one, if not the, most beautiful I have ever seen, and that's saying a lot.  The designs, the weight, the specialty finishes all combine to make these "must haves" if you love paper as much as I do.  Now, thru May 31, 2018 you can take advantage of some beautiful special offers from Stampin' Up! on the early release of the Share What you Love Suite.  Remember the papers are available on early release in the Gotta Have it All bundle.

Here's a video showing the papers and projects, just click on the picture to the right.

To see the actual bundles, just click on the picture below.

3 Great choices for Early Release

Just click HERE or on the picture above to take a closer look at the wonderful options you have for these early release bundles.  And remember with your purchase of any of these bundles, you will receive Free items from Stampin' Up! and 4 Free card kits from me. 

The Gotta Have it All bundle includes the gorgeous papers and 3 great items for free from Stampin' Up!.  One of the free gifts is the limited edition Statement from the Heart stamp. 

These are the four card kits I will send you, Free! They are made using some of my favorite retiring Designers papers and bundles.  Kits include all the die cuts, ribbons, embellishments and pre cut pieces to make the cards.  Plus the envelope.
A printed sheet with instructions
is also included.
(Just a note:  you will receive the four card kits, Free, with any minimum $45 purchase now thru May 30, 2018 if you use the HOSTESS code HAWVET9S  when you order)

12 x 12 Collage Perfect for my Scraproom

Here's a fun collage I made with one of my favorite papers from the collection.  I had so much fun using several stamp sets and fussy cutting the flowers to layer on top.  ( Hint: I cut out the square of designer paper that would be hidden behind the layers to fussy cut my flowers from.) 

Here's a few cards I have enjoyed making with this suite.  For the one with the Oh, darling you are fabulous sentiment, I used the dies from the Petal Palette bundle for the flowers and then sponged a separate piece for the background for behind the flowers.  I adhered this layer behind the die cuts and fussy cut around them.  The leaves are punched with the Leaf Punch, #144667 This is probably one of the most used punches I own. The large die cut  and sentiment on that card and the Thank You on the other card is from the new to be released in June "Stitched All Around" bundle.  You are going to love this new set!  
Here are links to a few of the wonderful items I used to create these projects, and the new  Early Release Bundles:


I have listed the Rich Razzleberry and Tranquil Tide inks in the current pad style, but did you notice the bright and beautiful new In Colors are available in the NEW ink pad design?  You are going to love them!  (please note:  if you order any of the new Share what you love bundles, you will receive a Grapefruit Grove ink pad.  This is one of the new In Colors that is in the ink color bundle.  So if you ordered both, you would have two Grapefruit Grove.  You can either share with a friend or wait, if you can, to order the new in color bundles in June or order, a la carte, from the new Share What you Love Suite in June, but you will miss out on the Free Items from Stampin' Up!  The value of the Free items more than outweigh the cost of the ink pad.)

Happy to help.

If you have any questions about these great new bundles or any of the items I have shown here, please let me know.  I will be happy to help in any way I can. 
I hope you can take advantage of these wonderful deals in May, I just know you will have a wonderful time crafting memories with these amazing new products.

Thursday, May 3, 2018

New Kits just released!


Ready for warmer Spring and Summer days?  This gorgeous Couture Creations paper just looks like a summer paradise.  Don't just think of the beach, think of just sailing away together thru every day.  Enjoying every minute together.  Well that was my thinking when I made this layout.

Using these beautiful papers was easy, but even more fun was embossing the chipboard die cuts with the incredible Stampendous chunky embossing powders.  The mix of colors and textures make these pieces look so rich and time-worn.   Of course I had to add fleur di lis's to the compass rose.  Just love how this layout turned out.  Hope you like it, too! 


 Next up, this bright and cheery Smile layout.  It features the darling Echo Park Flora collection.  With this kit you will receive a whole sheet of coordinating stickes and perfectly matched flowers and bling. 

One of my favorite sentiments..."Throw kindness around like confetti".  Love these colors for beautiful Spring pictures.  And the upbeat, happy fell of the layout. 
Okay, I want to know...did Photo Play make this paper just for me?  I love the mix of patterns, the colors and the gorgeous roses!  I thought the silver, metal embellishments added a spirited touch and loved making the custom coordinating flowers. 

If you would like to order any of these kits, just click on my Scrapbook Kits Page at the left, and see these and more.  Plus, shipping is only $7 no matter how many kits you order! 

Hope you all are having a wonderful start to Spring and are having a beautiful time "crafting memories" to save for a lifetime!

Hugs,
Molly D

Wednesday, April 25, 2018

Impossible Card Template and Last Chance Update


Easy Template for an "Impossible Card"

I wanted to share this easy template I made to create this impossible card.  Why is it called impossible?  Because when you first look at it, it seems impossible to have cut it out of one sheet of paper.  But it is really easy if you know the "trick". 
Receive these 4 card kits free with your minimum $45 Merchandise Purchase from
my Stampin' Up! store, using 
the HOST Code
HAWVET9S

offer good from April 25 to May 15, 2018.
(please note:  just like the retiring items from Stampin' Up!, quantities are limited, so hurry and order yours now!)
Oh So Eclectic Designer Paper
Hurry and get yours while supplies last!
(now thru May 31, 2018 or while supplies last)
Just click on picture to order now.
Oh So Eclectic Bundle
Hurry & get yours while supplies last!
The stamp and dies are going forward separately, but you can save 10% by ordering the bundle now.
(now thru May 31, 2018 or while supplies last)
Just click on picture to order now.