Tuesday, June 27, 2017

Easy Watercolor Background Techniques using Stampin' Up! Inks


Oh my gosh golly, I have been having too much fun playing with all the new inks and colors from Stampin' Up!  And while I love these great products, these techniques would probably work with other die based inks.  Just want to warn you, it's pretty addictive.  And you may get a little color on yours hands...of course, I consider that an added bonus, lololol.
So, anywho, here are a few closeups of some of the cards I made with the backgrounds. The how-to video is posted above.  I loved using the rich inks from Stampin' Up!.  The colors are so vibrant and intense.  I hope you enjoy. 

Dragonfly Dreams Photopolymer Stamp SetDetailed Dragonfly Thinlits Dies
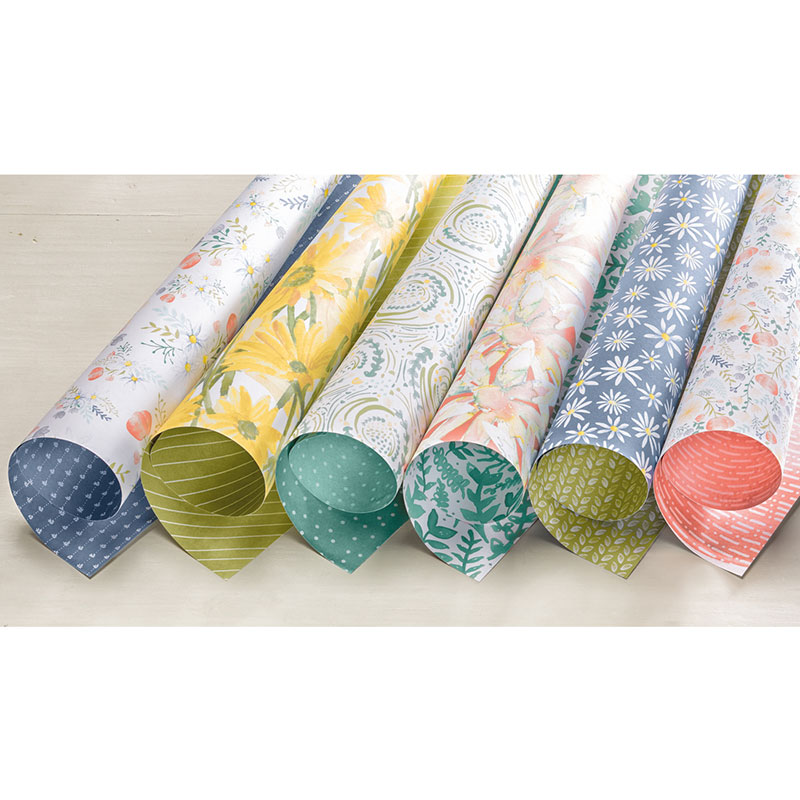
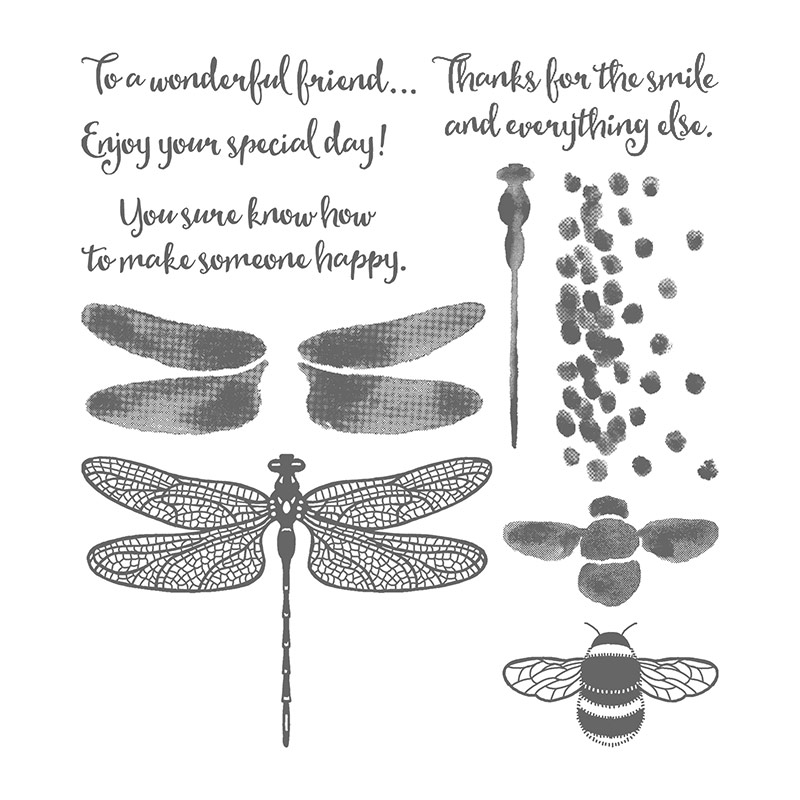
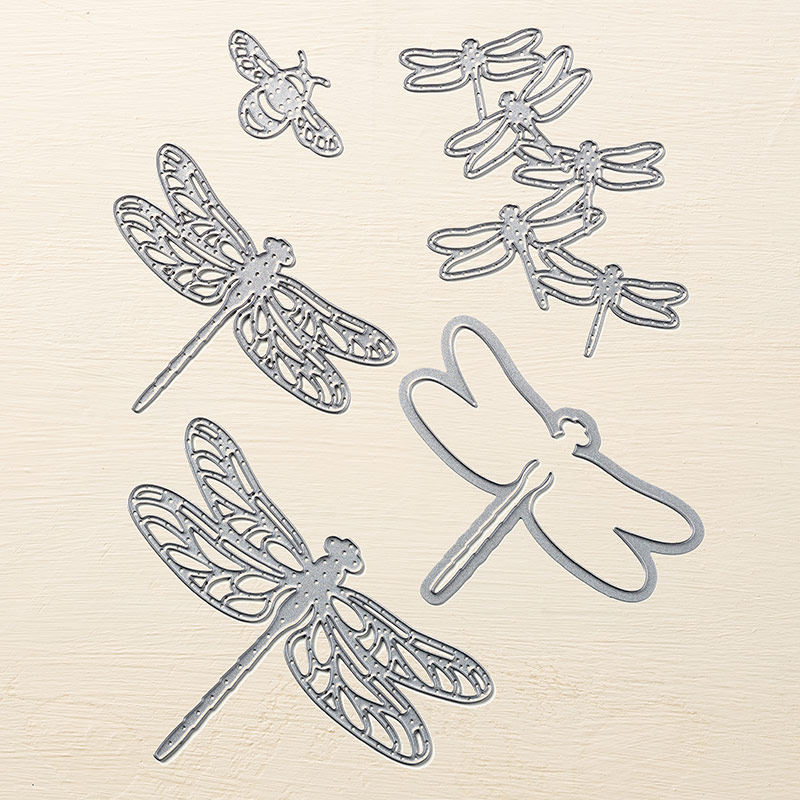
The gorgeous dragonflies you see on several of the items are made with the gorgeousDetailed Dragonfly Dies and Dragonfly Dreams Stamps.  I just love using these.  I haven't even played with largest one or the bee yet!  Just can't wait!


And if you are interested in any of these items, be sure to visit my online store HERE.


 So, as always...have fun crafting!


Saturday, June 24, 2017

 I made two quick and easy Z Fold cards yesterday, using the Big on Birthday Stamps and Delightful Daisies Designer Series Papers.  Just wanted to share with you how super duper easy making fun fold cards can be. I've attached the video so you can see just how simple making these cards is!

This fold is one of the easiest I have seen, yet lets you use bits and pieces of designer paper, to give it a "wow" impact.  And even as easy as this it to make, the fold and surprise reveal gives it a pop of fun for the receiver.  


The Stamp set, Big on Birthdays, is super fun and
Big On Birthdays Photopolymer Stamp SetDelightful Daisy Designer Series Paperjust as the name implies, has big, bold stamps that pack a punch.  But, it also has great smaller stamps to round out your birthday message. See it in the catalog HERE!

And if you haven't already seen the gorgeous new Delightful Daisies papers, here's a quick peek.  Be sure to check out the great collection HERE!

Collection has great papers, stamps and an incredible punch that you will love!

I hope you enjoy making some fun, fancy fold cards and be sure to Follow and Like my Facebook page  HERE!

Thank you so much for stopping in, and as always...have fun crafting!


Wednesday, June 21, 2017

Scrapbook Layout using Whole Lot of Lovely from Stampin' Up!


True story. I wanted to make some cards with this gorgeous paper collection from Stampin' Up! Took out everything I thought I would need, the Lovely Friends stamp set and the Whole Lot of Lovely Designer Series Papers and some matching solid papers and inks. .And about an hour later, I ended up with this scrapbook layout. 

If you haven't seen my latest video on Youtube, I shared the news that I have become an Independent Stampin' Up! Demonstrator.  What does that mean?  I originally signed onto a team to get a discount on my Stampin' Up! orders.  Easy to do and no strings attached.  But once I got my first two orders in, I admit it, I was hooked.  

Yes, I know, I have a craft room overflowing with beautiful papers and supplies.  So why order from Stampin' Up! ?   The papers!  The quality!  The colors!  Everything is so beautifully coordinated and great quality.  

I have been having fun the last two days making some cards and this quick layout.  And wanted to share my excitement with you.  I will be doing a tutorial on some cards using this paper line and stamps soon.  But I couldn't wait to share this layout.  Just so cheery and bright.  

If you are interested in shopping in my Stampin' Up! store, the link is HERE.

And please follow my Facebook page...escapetoinspiration HERE .

Oh well, the night is young...off to making some cards now...teeheehee.
Have fun crafting!
Molly D


Sunday, May 7, 2017

May Happy Planner Labels with Watercolor Florals

 Well, I'm trying to take my own advice and learn something new everyday.  

These may just look like ordinary Happy Planner labels to you, but to me they are something I learned how to do today.  I had been wanting to make some planner labels that were not just rectangular, but I love putting quotes and "talking to myself" motivational ramblings in my planner.  So I decided to up my game a little and teach myself how to think "outside of the box".  

Of course I am still having so much fun discovering and playing with all the beautiful florals from the bundle I bought from Creative Market recently.  So I used those as the starting point, along with my Silhouette and created these really rather easy labels. 


I hope you can see in the pictures how the florals spill out over the borders of the boxes.  No, I didn't fussy cut them, I let the Silhouette do all the work.  Okay, all the work after I designed them.  And that was where the learning something new came in.  

Here's a tutorial I did showing how I created these:


I posted below, some screen shots of the Silhouette mats with and without the cut lines to show you how I laid them out.  I do have a wide format printer, so I was able to use 12 x 12 paper, but you could just as easily lay them out on an 8 1/2 by 11 format.


Here's the layout without the cut lines and below is the screenshot of the layout showing where the cut lines will be.
Have fun creating today!  And learning something new!
Molly


Tuesday, April 18, 2017

Planner Printables for Digital Watercolor Bundle

Well, I was hoping to get a tutorial done today showing how I use downloaded digital files to make planner labels and scrapbook embellishments.  Unfortunately, once I started cleaning and doing some small housework projects, time got away from me.  BUT, I did manage t make some new labels for my
Big Happy Planner.

I used the beautiful graphics I bought from Creative Market, and had so much fun just playing.  As you can tell from the thoughts on the labels, I was in a very, very happy mood.  Playing with color and flowers and trying to learn new digital skills.  I was in Heaven!   So I wanted to share them with you,  I hope you enjoy.


The flowers used on these labels came from the Huge-Floral-Graphic-Bundle sold on Creative Market.
I hope you are having a wonderful Spring, and are having fun crafting. Hope I get more crafting done tomorrow!

Enjoy!
Molly

Beautiful Flower Graphics Package Deal for Crafting Designs

Good Morning!  I am so excited to start the day crafting.  I found this gorgeous, over the moon beautiful graphics bundle on Creative Market.  I usually hate paying for graphics, but this bundle has the most glorious collection of watercolor florals and backgound papers, so I splurged and bought it.  I haven't really started getting to creative with it, but I did make a new background for my desktop, and I pictured it above.

Stayed up late last night, downloading all the files and opening each one to see just how jammed packed it was.  Now I don't work for Creative Market, and don't usually like to push any product, but....I do like to share things I think others may enjoy.  And this kit is one of those things. Most often, I just download the freebies from sites like these, but decided that $35 for a huge, and I mean huge bundle, was a great deal.

Plus, the license lets me use the graphics to create things I can include in scrapbook kits or other crafty projects for sale.  So, in my mind, this kit will pay for itself, right?  Well that's my story and I'm sticking to it.

So anywho, if you like digital graphics and flowers and watercolor, you might want to check this bundle out!
I hope to be doing a video later today, after a little housecleaning, of how to download and use graphics like these.  Wish me luck.

And I hope you have a wonderful day crafting.
Molly

Here's the link to this site:  Creative Market
Watercolor Floral Graphic Bundle - Illustrations


Sunday, April 16, 2017

Picture Perfect Day! Spring Scrapbook Layouts

It is a perfect Spring day.  It's actually Easter Sunday and I am enjoying spending the day in my craft room and putting the finishing touches on some new scrapbook layouts.

Now anybody that knows me, knows vintage is probably my favorite style.  I love to grunge anything up and have a sweet, romantic vintage look.  So when I found this DCWV pad at Joanns I fell instantly in love.

I used that paper pad for these three layouts and just love how they each turned out.  It was so much fun to spray some of the flower layers with Lindy's Stamp Gang sprays.  Other layers were cut out from some printed papers I found to tie into the look.  I even cut some of the flowers and layers from vellum for this Picture Perfect layout.


Lace and butterflies add such a soft look to this Sweet Memories layout.  I actually dug thru my ribbon drawer to find the old heavier lace flowers and leaves.  Such a little bit added such a nice touch.

Now I know I could have added even more trinkets and treasures to them, but as always I find I hold back for a cleaner look.  My reasoning has always been that I want my pictures to be the focal point.  At least that's what I always tell myself.  It could also be that I am a little bit too lazy to keep rummaging thru my stash for the perfect piece to add in.  Either way, I love how these three turned out.
The last of  the three I finished up today is this "I will always Remember" layout.  Very little embellishing was done, but I really felt like the pictures and the old postcards tied in hand dyed ribbon tell the story.  So anywho, there you have it.  Three completed layouts!

Here's to a beautiful Spring to everyone and a blessed and happy Easter!
Have fun crafting!   Molly


Saturday, January 28, 2017

Anna Griffin Scrapbook Layouts

With it getting closer to Valentine's Day, I thought I'd keep playing with my Anna Griffin stash.  Just had a wonderful time trying my best to use up some of those gorgeous Anna Griffin papers and embellishments I have been hoarding.  
Of course Anna if known for her beautiful flowers, so it was easy to create these bursting with beauty Spring layouts.  If you are an Anna fan at all, you might recognize that I used old and new pieces from her lines to create these.  And one of my favorite things about her line is that the colors from one to another match so perfectly. 

I created this title by teaming up my Silhouette and Cricut Design Space programs, using Anna Griffin cartridge artwork.  The "love you" was cut on the Cricut out to heavy chipboard.  While the florals and offset backgrounds were cut with the Silhouette.  ( I made a video on how I did this and have it uploaded at the bottom of this post.) 

I applied a little glue to the edges of my butterflies and title, then just pressed on some gold foil to give it just a little extra sparkle.  

Even the older embellishments, like the chipboard letters I bought over 5 years ago, still blend in so well to complete these pages.And the tags and quotes from different packages I have bought over the last several years, yes, they too helped create these finished projects.

 This 2 page spread is made using the Juliet kit I bought recently from HSN.  Just love love love the sweet look of this happy pair of pages.
 I did use some paper flowers I had bought from Michaels, Prima and Hobby Lobby on this layout. They blended in so perfectly with Anna's more casual style of these papers. Plus, I was able to layer in some of the vellum quotes I have stashed away!  All of Anna's kits come with so many pieces, but I still find myself so hesitant to ever use any of them.  I know, I know....it's a true mental condition I have here...I think I read recently it was called the SABLE syndrome...Stash Amassed Beyond Life Expectancy.  Lolololol, yep, definitely my problem...and I embrace it happily! 

Thank you so much for sharing this gorgeous obsession with me.  
And have fun crafting!

Here's the video on how I made the title on the first layout.


Thursday, January 26, 2017

Graphic 45 Olde Curiosity Shoppe Mini and Layout


Still working on "stash busting", having fun with my old Graphic 45 papers.  G45 just "re-released" this wonderful old collection, so I pulled out mine and got to work.
First I scavenged around and found an old book box I had bought years ago.  It was perfect!  Next pulled out the chipboards and papers I had from the collection and made a little mini to fit neatly inside the box.                                                                                        
I have attached a quick video I did of the mini and the two page scrapbook layout I just finished. And here's some close ups to showcase the gorgeous papers!

The quirky quotes I stamped, embossed, then cut out were from Dyan Reavely.  An incredible mixed media artist.  She just released a new set of stamps at the recent Creativation in Phoenix and yes, indeedy, I want them!  Wasn't this all about using what I have????  

Okay back to that "happy stash" and the fun of creating!


Saturday, January 21, 2017

Anna Griffin Craftroom Fun Decor

Well New Year's Day has come and gone, and I am trying to keep a promise to myself.  Use my stash!  

HSN had a 24 hour crafting day recently, featuring Anna Griffin.  Boy oh boy, did that test my will power.  So to try to keep me from overbuying, again, I decided to play with my Anna stash all day. 


And to get me in the mood even more, I decided to quickly update my craft room look, using Anna Griffin papers and embellishments. 

Here's a quick video of how I used Anna papers to create a few fun pieces to give a fresh, new look to enjoy while I craft!  

I love the quick and easy paper quilt piece I made for my wall.  


Good news, I only bought two things on HSN that day.  Bad news, they are having another full day of crafting in March, and Anna is having an online warehouse sale January 30th.  I mean really,  can I really be expected to resist.  I am only so strong.  

Have fun crafting and using some of your own glorious stash!


Saturday, December 10, 2016

Cookie Recipe Swap Mini Album


 What a blessing!  I went to a crop in Crowley, LA last month with an incredible group of ladies called "Scrapbooking with Friends".  Paula and Margie host this group and each month is a wonderful treat.  But oh my Heaven's above, November was over the top!

Several of us croppers participated in a Cookie Recipe card swap and man oh man, did the ladies out do themselves in the creativity department.

So then the burning question becomes....how do I showcase these treasures?  Need to be protected, but I definitely want to use the recipes...hmmm.  And it's got to be cute, so I can count it in as part of my holiday decorations.

Well, after a month of toying with the ideas of making a box, binding them with my Cinch, trying to find a cute 6 x 6 mini album, I got a tap on the shoulder from above.

Late one night while I was sleeping, I swear, an jolly Christmas angel tapped me on the shoulder and said....with quite an attitude..." Girl, you are trying to use up your supply stash...don't you even remember you have those 6" x 12" Bazzill albums.  You've had for years!  Use the darn things!"

So not one to argue with an angel, I got up, dug out one of those mini's and voila...it was perfect for these darling recipe cards.  

Now those creative ladies did throw a few curves in the planning in how to display these recipes.  Some had pull outs, some had pokey outey embellishments, some had decorations that went past 6".  But no worries...I just "reshaped" a few of their pokey outies.   And got out the double sided extra strong tape and taped the ones with flaps and flips and pull outs directly on the outside of the page protectors.  


A small group even made pages that both sides just had to be seen, so I made sure that happened, too.  Then I  took a few extra minutes to "compose" what pages I wanted to show in a two page spread.  Now I just love love love my new recipe book.

Lucky for me, there was even a spot or two to put pictures in to remind me of the wonderful group of ladies that come together once a month to create.  Oh, and on that note, I did make sure to rewrite the names of each lady on the front of the card or on the pull outs.  I know I will want to remember exactly who gifted me with these amazing recipes.

Now that this project is done, I just need to make my shopping list, head out to the store for all the sweet ingredients and a new pair of two of stretch pants.  

Don't you just love Christmas!  And especially sharing the joy with good friends and family.  Happy holidays and Merry Christmas to you and yours....now about those cookies....can't you just smell the vanilla in the air....

Joy to you all and have fun crafting!
Molly D


Friday, December 9, 2016

Pop Twist Cards- a quick share


Just wanted to share a quick video for two pop-twist cards I made.  To make these fun 
cuties, I used the Cricut Design Space cut file from Obsessed with Scrapbooking.

She was so generous to share this tutorial and file with us all.  I had so much fun making these quick and easy, but oh so dramatic cards.  Hope you will give it a try, after watching her video!

Happy holidays and Merry Christmas to you and yours.  Now back to crafting!
Molly D


Thursday, December 8, 2016

Simple Stories Santa & Co. Mini Album and Layouts


Made  a video of a quick tour thru my latest little mini album.  I used the happy Santa & Co. line from Simple Stories.  Have had these fun papers, stickers and embellishments in my stash for quite a while and was bound and determined to use them all up in projects this year.  Well, I got very close, just have 4 or 5 sheets of the paper left.  Whew!  

This style was not my original idea.  I was inspired by a mini album a very talented friend of mine did from a kit from a few years back from one of the best scrapbook stores in the universe.  Treasured Memories in Lafayette, La  Janet owns the store and she and her team create beautiful layouts and share their talents during crops and classes.  And if you are ever in the market for page kits for scrapbooking, you won't find any better styles or values than those at  Treasured Memories.   

Now, as I tell about in the video, I did change up the format just a little to allow from thicker embellishments and pictures, but the idea is basically the same.  And along with the book I did a four "pocket" pages and two single page layouts from the same line.  And yes, even after all that, I still have paper left....and yes, I know I have a paper problem.  But I can't imagine having a better addiction than that!

Happy crafting to you all and Happiest of Holidays and Merry Christmas to you and yours!